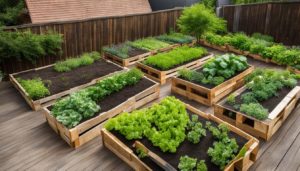
Building planter boxes from pallets is a cost-effective and eco-friendly way to create beautiful containers for your plants. With just a few tools and some pallet wood, you can easily build a sturdy and durable planter box that can last for years. This DIY project is perfect for beginners and can be completed in just a few hours. Not only will you save money by repurposing pallets, but you’ll also have a unique and customizable planter to showcase your favorite flowers, herbs, or vegetables.

Key Takeaways
- Building planter boxes from pallets is a cost-effective and eco-friendly DIY project.
- You can easily create a sturdy and durable planter box using pallet wood.
- This project is perfect for beginners and can be completed in just a few hours.
- By repurposing pallets, you can save money and reduce waste.
- Customize your planter box to showcase your favorite plants and add a personalized touch to your garden.
Materials and Tools Needed
Before you begin building your planter box from pallets, make sure you have the following materials and tools on hand:
- Pallets – Choose pallets that are in good condition and free from any chemical treatments.
- Measuring tape – Use a measuring tape to accurately measure the dimensions of your planter box.
- Saw – A saw, such as a circular saw or a reciprocating saw, will be needed to cut the pallets to size.
- Sandpaper – Sandpaper will help smooth out any rough edges or surfaces on the pallet wood.
- Drill – A drill with both drilling and screwdriving capabilities will be essential for assembling the planter box.
- Screws – Choose screws that are the appropriate length for securing the pallet wood together.
- Paint or stain (optional) – If desired, you can paint or stain the planter box to enhance its appearance and protect the wood.
- Brush or roller (if applicable) – If you decide to paint or stain the planter box, you’ll need a brush or roller for application.
Having these materials and tools ready will ensure a smooth and efficient building process for your DIY pallet planter.
Table: Materials and Tools
| Materials | Tools |
|---|---|
| Pallets | Measuring tape |
| Sandpaper | Saw |
| Screws | Drill |
| Paint or stain (optional) | Brush or roller (if applicable) |
With these materials and tools at your disposal, you’ll have everything you need to get started on your pallet planter project. Now that you’re equipped, let’s move on to the next section, where we’ll guide you through the step-by-step process of building the pallet planter.
Building the Pallet Planter
Now that you have gathered all the necessary materials and tools, it’s time to start building your pallet planter. Follow these step-by-step instructions to create a beautiful and functional DIY pallet planter:
Gather Your Pallets
Begin by finding suitable pallets for your project. Look for pallets with intact boards and sturdy construction. It’s best to choose pallets that are in good condition and free from rot or damage.
Prepare Your Work Area
Clean and clear a designated work area where you can assemble your pallet planter. Make sure you have enough space to comfortably work and lay out your pallets.
Measure and Cut
Using a tape measure, determine the desired size of your planter box. Mark the measurements on the pallets and use a circular saw or reciprocating saw to cut the pallets to the appropriate length.
Assemble the Planter Box
Once you have the individual pieces cut, it’s time to assemble the planter box. Lay the bottom piece of the planter flat on your work surface and attach the side pieces to create a rectangular frame. Use a drill or screwdriver to secure the pieces together with screws or nails.
Stabilize the Planter
To ensure the stability of your pallet planter, add additional support by attaching pieces of wood to the inside corners of the planter box. This will strengthen the structure and prevent the pallets from shifting or coming apart.
Optional: Add a Backboard
If you prefer a more finished look for your pallet planter, you can add a backboard to enclose one side of the planter box. This can be done using additional pieces of pallet wood or a separate piece of plywood.
Finish the Planter
Once the assembly is complete, sand the surfaces of your pallet planter to remove any rough edges or splinters. You can also apply a coat of paint or stain to enhance the aesthetic appeal and protect the wood from weathering.
Congratulations! You have successfully built your own DIY pallet planter. Now it’s time to move on to the next step – filling and planting your planter box. Continue reading to learn how to create a thriving container garden with your new pallet planter.
Filling and Planting the Pallet Planter
Now that you have successfully built your pallet planter, it’s time to fill it with soil and start planting your favorite plants. Container gardening in pallet planters is a great way to maximize space and create a stunning display of greenery and blooms. Follow these steps to ensure your plants thrive in their new home:
Step 1: Prepare the Planter
Before adding soil, line the inside of your pallet planter with landscape fabric or plastic to prevent the soil from seeping through the gaps. This will also help retain moisture and protect the wood from rotting. Trim the fabric or plastic to fit the planter, leaving a few inches of overlap to secure it.
Step 2: Choose the Right Soil
Select a high-quality potting mix that is well-draining and nutrient-rich. Avoid using garden soil, as it can be too heavy and compacted for container gardening. A good potting mix will provide the right balance of moisture retention and drainage, ensuring optimal growing conditions for your plants.
Step 3: Plant your Plants
Start by adding a layer of soil to the bottom of the planter, about two inches deep. Gently loosen the root ball of your plants and place them in the planter, spacing them appropriately based on their mature size. Fill in the gaps with soil, pressing it gently around the plants to secure them in place. Water the plants thoroughly after planting to help settle the soil.
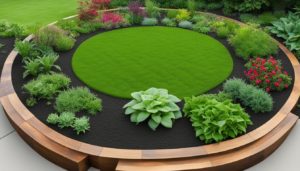
Depending on your plant selections, you can create a variety of looks and themes in your pallet planter. Mix and match different flowers, herbs, or vegetables to create a stunning and functional display. Consider the sunlight and water requirements of your chosen plants to ensure they thrive in their new environment.
By following these simple steps, you can transform a basic pallet into a beautiful planter that adds charm and character to your garden or outdoor space. Container gardening in pallet planters allows you to unleash your creativity and create a unique and personalized display of plants. Enjoy the satisfaction of nurturing your plants and watching them grow in your DIY masterpiece.

Conclusion
Building planter boxes from pallets is a cost-effective and eco-friendly DIY project that offers numerous benefits. By repurposing pallets, you not only save money on expensive planters but also contribute to reducing waste. Additionally, the process of building pallet planters allows you to create personalized and unique containers for your plants.
Container gardening in pallet planters provides a range of advantages. Firstly, these planters are sturdy and durable, ensuring your plants have a stable and long-lasting home. Secondly, they offer ample space for your favorite flowers, herbs, or vegetables to flourish. With the freedom to customize the size and shape of your pallet planter, you can plant a diverse variety of greens and blooms.
Furthermore, the DIY aspect of this project makes it accessible to beginners. With just a few tools and some pallet wood, you can easily construct your pallet planter in just a few hours. The step-by-step instructions provided in this guide ensure a smooth and hassle-free building process.
In conclusion, building planter boxes from pallets is a rewarding endeavor that combines creativity, sustainability, and affordability. By embarking on your own pallet planter project, you can enjoy the benefits of container gardening while showcasing your green thumb with a touch of personalization. Start building your pallet planter today and enhance your gardening experience.
FAQ
Can I use any type of pallet to build a planter box?
It is recommended to use heat treated (HT) pallets instead of chemically treated (CT) pallets, as they are safer for growing plants. Always check the pallet for any signs of damage or rot before using it.
Do I need to sand the pallet wood before building the planter box?
Sanding the pallet wood will improve its appearance and smoothness. However, if you prefer a more rustic look, you can skip the sanding step.
How many plants can I fit in a pallet planter?
The number of plants you can fit in a pallet planter depends on the size of the planter and the spacing requirements of your plants. It’s best to research the specific planting recommendations for each type of plant you want to grow.
How often should I water the plants in a pallet planter?
The watering frequency will vary depending on the type of plants and the weather conditions. It’s important to regularly check the moisture level of the soil and adjust your watering schedule accordingly.
Can I paint or stain the pallet planter?
Yes, you can paint or stain the pallet planter to customize its appearance. Just make sure to use a non-toxic paint or stain that is safe for plants.